Friday, August 31, 2012

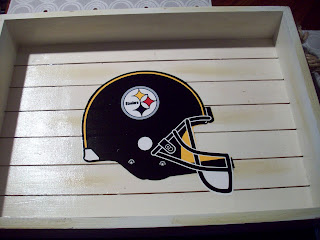
Updated serving tray

Did you go through the apple phase?  I never was into the apple deco kitchen style but I know it was very popular a few years back.   A lot of people seem to be trading in their apples for a new kitchen decor because I am finding tons and tons of apple motifs at yard sales. 

I purchased two of these trays for $1.50 each.  I knew I could make them cute and functional.  This is the larger one.


I really like the handles on this tray because of the wooden bead on the ends.

I got out my modge podge, some steeler fabric and leftover steeler wall paper border.  I've used these supplies on a few other projects too.  A little creativity later and this is what I came up with.


I cut a small logo from the fabric and modge podged it to the wooden bead

This tray is going to the Shop for resale.

I'll be linking up to:Two Yellow Birds Decor52 MantelsThe DIY DreamerChic on a Shoestring DecoratingSimply DesigningUndertheTableandDreamingI Heart Nap TimeAdd your LINKS!

Thursday, August 23, 2012

Modge podge + deck of cards = BAR TOP

If  you follow my blog you know that we just completed a remodel of our screened in porch.  Hubby and I purchased a unfinished bar for $7.00 at a yard sale.  We painted the bar and added a logo to the front and are very happy with the outcome.  The top of the bar was a different story.  We thought about adding a countertop but Lowes quoted us $300.00.  Seriously to cover a $7.00 bar.  I don't think so.  After a lot of complaining discussion about the top of the bar being to shiny Hubby kept bugging me to change it.  He wanted me to sponge paint the top.  I don't do sponge paint so that was not an option.  I thought about covering it with Steelers wrapping paper or Steelers Fabric.  In the end I didn't go with either of those.  I went with this option...........................

A deck of cards

Now this isn't just any deck of cards it's a deck with only Pittsburgh Steelers Star players.  I layed the cards out and modge podged each one individually.  On the corners of the bar I added the Steelers logo from wrapping paper that I had.  
see the logo on the corners from wrapping paper
After I was happy with the placement and I was sure that all the corners were stuck down.  I added about 3 coats of modge podge to the entire top.  Letting it dry in between each coat.  After all layers were dry, Hubby decided to help and he sprayed the entire top with Polyurethene.  

You can't see the detail on the cards but each one lists the player and the years that they played and something unique about them. 


Here's a look at the entire bar.  I can't get a good picture but you get the idea.   Now keep in mind that we only paid $7.00 for the bar so we weren't too serious about the entire thing.  It is definetly a conversation piece.  If you are a true Steelers Fan you will appreciate our bar.   

 We are getting a lot of compliments on it except for my son who is a Cowboys fan.  He doesn't think it's very cool.   Hubby is happy with his Steelers corner and I'm happy it's done. 

Come join the parties at:The DIY DreamerAdd your LINKS!


Tuesday, August 14, 2012

Steeler Bar stools for $2.00

I found these two bar stools this Summer at 2 different yard sales. I paid $1.00 for each one.  I couldn't believe how lucky I was that they matched.  The needed to match the Steeler Bar that we made over last month.  You can check out my previous blog post here:  http://sister-number-5.blogspot.com/2012/07/steeler-bar-take-ii.html


This is what they looked like to start with.


I wanted a circle in the middle so I could paint it gold.  I found the perfect size bowl and traced it on the top of the stool.


Next up I needed to paint them.  First the black on the outside of each one.


I waited for the black  to dry and then added the gold to the center.


My daughter came home with her vinyl cutter and we added our favorite Steelers number and name to the stools.  Hubby's is Lambert and mine is Bettis. 


Close up shot of the top.


The bar is complete.  Just in time for football Season!!!!!


I'll be linking up my black -n- gold to:

<a href="http://kammyskorner.blogspot.com"><img src="http://i1235.photobucket.com/albums/ff438/kammyskorner/TtoTKammyKorner.jpg" border="0" alt="Photobucket" /></a>

Two Yellow Birds DecorThe DIY DreamerPhotobucketAdd your LINKS!UndertheTableandDreamingI Heart Nap TimeGrab button for Creating with the Stars


Sunday, August 12, 2012

more chalk paint projects

Drum roll please..............my blog is officially 1 year old today.  I can't believe I've been blogging for 1 year and I still love it.  

This is how the shelf looked when I purchased it for $3.00. I used it in my home office for a while but decided it needed a new home and a new look.


A little homemade gray chalk paint later and this is how she looks.


I also used the same paint and redid an antique frame that I found last year.  The 3 tier shelf in this picture was also painted at the same time.  I posted about it earlier. 


All 3 of these pieces sold within a week. 


I'll be linking up to :MakeitPrettyMonday

Two Yellow Birds DecorThe DIY DreamerPhotobucket


Monday, August 6, 2012

$5.00 thrift store table

I found this table at our local thrift store.  I found it on sale for 1/2 off.  What a steal at $5.00. I wasn't sure what direction I was going with the makeover, but I knew I was using my new favorite homemade chalk paint.  This is what it looked like when I rescued it.


I gave the entire table a coat of white paint.  I let it sit there for a week and kept changing my mind as to what color I wanted to paint.  I thought red, mustard or black.  In the end I decided to go with gray and leave a white stripe on the top and bottom front. 

I'm very happy with the final product.  What do you think?


I'll be linking up to:

MakeitPrettyMondayPhotobucketTwo Yellow Birds DecorThe DIY DreamerPhotobucketAdd your LINKS!