Tuesday, December 6, 2011

Christmas Decorating yard sale style Take VII

If you are wondering, yes I do go to a lot of yard sales.  My girlfriend and I go every Saturday from May to October.  We start out at 7:45 each Saturday with the newspaper in hand and hit as many as we can.  We go rain or shine.  We laugh a lot and get a lot of bargains.

All I did to this is add some snow (Epsom salts) and a small votive candle.  I added a few peppermint candy ornaments and a bell to the side. 


Funny story: I caught hubby trying to unwrap one of the peppermint candy ornaments.  I let him struggle for a few minutes before I told him they were “fake” and he couldn’t eat them.  I got a good laugh out of that one. 

Monday, December 5, 2011

Christmas Decorating yard sale style Take VI

More yard sale deals.  I bought 3 of these apothecary jars last summer for a total of $5.  For the life of me I can’t find the 3rd one.  (I’m thinking I may have given it to my daughter.)


I added some peppermint candy and a few red ornaments and I tied a large bell to the top. 

Pretty festive and very cheap.
 
Buona Natale everyone, that's Merry Christmas in italian.

all crafts Homemade Projects ~ Add Yours {12/6}

Sunday, December 4, 2011

Christmas Decorating yard sale style Take V

This may be the biggest centerpiece on earth but I love it.  I bought this basket at a yardsale for around $2.00 and my intention was to add it to my dining room table to house all my winecorks.  Hubby  axed that idea saying it was just too big.  So the compromise was I wouldn’t use it every day but I was definitely using it at Christmas time. 


This is the second year that I’ve added it to my Dining room table for my Holiday centerpiece.  It looks awesome and I get many many compliments.  All I did was add a bunch of ornaments that I purchased over the summer at yard sales and thrift stores. 


This baby holds a lot of ornaments. 

Between Naps On The Porch                      all crafts Homemade Projects ~ Add Yours {12/6}

Saturday, December 3, 2011

Do you have a favorite Christmas Decoration?


Of all the Christmas decorations that I have had through the years I can honestly say this is my favorite.


I inherited this about 11 years ago when my father passed away.  He made this candle himself many years ago and I remember my parents always had it somewhere in their house during the Holidays.   

Now this light shines in my house during the Holiday Season every year and I just love it. 

Tuesday, November 15, 2011

Christmas decorating yard sale style-Take IV

This stool I bought for $5.00.  I am not doing anything creative to it.  I like it just like it is. 

View of the top of the stool

Thanks for stopping by.  Leave me a comment so I know you where here! 

Sunday, November 13, 2011

Christmas decorating yard sale style-Take III

I purchased this sled at a yard sale this summer for $1.00.  I added the last of my uppercase living snowflakes  $.50 and some greenery to the top.  I glued on a few Christmas bulbs.  The greenery and bulbs were also yard sale finds. 


I'm thinking this costs a total of  $2.00.   Let me know what you think of my discount decorating.

Thursday, November 10, 2011

Hats off to my Beautiful Niece

Back in April my beautiful niece turned 40.   To help her celebrate her sister “BellaBud” threw her a birthday party.  The party was titled “hats off to Leigh.”  I was in charge of the favors, I decorated wine glass with polka dots.  I will post more on the favors later. 

I wanted to share with you the gift I made for her.  She has always worn hats for as long as I can remember hence the “hats off” theme.  So I decided I wanted to decorate a hat box for her.  I went to Ollies and purchased as hat box on clearance for $1.99.  I wish I would have taken a picture of the box before I started but I forgot.  Sorry.

First I painted the box white and then I used crackle paint over top of the white.  The next step was to paint over the crackle paint with black paint.  I left the ridge of the hat box the original color because it coordinated with my color scheme.  I made copies of all the pictures that I had of her wearing hats and decoupaged them on to the box.  I took a wooden flower and painted it black and glued it to the center of the box.  I just printed out the words “fabulous at forty” and glued them to the flower.


I forgot to mention we all had to wear hats to the party.  Here is a picture of my mother, the birthday girl and me.


I love how it turned out and she loved it. 

Leave me a comment I’m curious what you think. 

shabby creek cottage 
Between Naps On The PorchBLOG TITLEall crafts Homemade Projects ~ Add Yours {11/8}

Wednesday, November 9, 2011

Christmas decorating yard sale style-Take II

All of these ornaments were purchased this summer at various yard sales.  I never pay more than $1.00 for ornaments.  It is absolutely amazing how many beautiful ornaments are out there.

The vases came from the Dollar Tree.  Take one vase and one glass candle stick.  Each $1 at the Dollar Tree.  Use gorilla glue to glue them together.  I just added different size bulbs.

The dish was purchased from a thrift store for .99 and I just added more bulbs to coordinate with the vases. 

Very simple and cute.

My estimate on the cost of all this would be $7.00. 

Tuesday, November 8, 2011

Christmas decorating yard sale style-Take I


**Red square plate purchased this summer at a yard sale for 50 cents.  I added the Uppercase living snowflake also purchased for 50 cents at a yard sale. 


**Red candle purchased $1.00 at a yard sale.  I painted the candle with modge-podge and then rolled it in epson salts.  I glued a white snowflake with gorilla glue to the front.  I purchased the black candle vase from the Dollar Tree for $1.00.


**Double tea light I purchased for $1 at the Dollar Tree, painted the top with modge podge and rolled in epson salts. 

All this for under $5.00.  Not bad at all.  
all crafts Homemade Projects ~ Add Yours {11/8}

Sunday, November 6, 2011

Christmas Ornaments

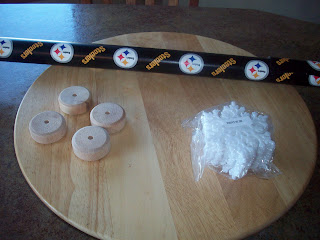
You could make these ornaments for your favorite team.  Our favorite team happens to be the Pittsburgh Steelers.    I used wrapping paper, modge podge, wooden discs and snowflakes.

All these items were purchased at yard sales.  The wrapping paper I've had for about 3 years. I just keep cutting it up and using every bit of it.

Wooden discs I bought 12 for $1.00

Snowflake ornaments I purchased 40 for $1.00

Glass beads (not pictured) were from the dollar tree you get a bag for $1.00


I painted the wooden discs black.  I cut the circles out of the wrapping paper and then modge podged them on to the discs.  I then glued the discs on to the snowflakes

For the glass beads, I cut the circles out of the wrapping paper and modge podged to the back of the glass bead. 

When all were dry I used gorilla glue and glued the discs and the glass beads to the snowflake.  Here is the finished product.


Thanks for visiting.  I would  love to hear what you think of my ornaments.
I'm linking up to:

BLOG TITLE

Between Naps On The Porch

all crafts Homemade Projects ~ Add Yours {11/8}
shabby creek cottage

Home made bread making 101

I decided to try my hand at making bread from scratch again.  I've tried this in the past and I was always disappointed.  Since my culinary skills have improved I thought I would try again.  This is another old recipe from my Mother's recipe box.


I love that this recipe is in my Mother's handwriting and that she wrote in the corner who the recipe was from.  (I remember her friend Virginia when I was a little girl)


All mixed up and ready to let raise


Finished baking and hot out of the oven!  The house sure does smell good.


Okay, they tasted wonderful but they still aren't perfect.  The bread is a little flat, as my hubby reminded me at least 10 times, but they tasted great.  I refuse to give up, I'm going to keep trying this recipe until they are just like my Mother used to make.  Stay tuned for bread making 101 take II coming soon.

Monday, October 31, 2011

HALLOWEEN


Where did the years go?  This is a picture of my two little ones many years ago. 

My little ones are now 26 and 22.  Seriously, it seems like just yesterday they were this size. 

Happy Halloween everyone.  

Thanks BellaBud for the picture I stole borrowed from your Blog, I couldn't resist.

Saturday, October 29, 2011


Sharon from the blog From Rags to Rainbows awarded me with the Liebster Blog Award!
The Liebster Blog Award is given to up and coming bloggers who have less than 200 followers.  Liebster is a German word meaning clean, sweet, kind, nice, good, beloved, lovely, kind, pleasant, valued, cute, endearing and welcome.

Thank you so much Sharon! I am so honored and excited that you included me in your choices! Sharon  is ASHM that used to sell jewelry, and then made quilts, and now she is made up her mind to paint every piece of shiny furniture in her home. A girl after my own heart and wait to you see her work just gorgeous! You go girl!

Now, if you haven't visited Sharon's blog, you are missing out!!

To keep this award going and pass it along to other new deserving blogs, the recipient must now recognize four other bloggers with less than 200 followers that have stood out in the crowd.

The rules for the Liebster Award are:

1. Thank the giver and link back to the blogger who gave it to you.

2.  Reveal your top 4 picks and let them know.

3.  Copy and paste the award on your blog.

4.  Have faith that your followers will spread the love too!

So, here are my 4  blogs, in no particular order:

http://creating-with-the-js.blogspot.com/ - .

http://www.bellabud.com/-

http://kyleeelizabeth.blogspot.com/

http://missflibbertigibbet.blogspot.com/

Congratulations ladies!

Be sure to visit their blogs and share the love!

Sunday, October 23, 2011

SIMPLE but very cute

Here is the before version of the bar stool leftover from a set that I had at one time.  Just plain and boring. 


Here is the updated version using just some paint and an uppercase living snowflake on the top. I took a scrap piece of wood and painted it to match the top of the bar stool and used another uppercase living expression that says welcome.  A little bit of gorilla glue and a couple of snowflake ornaments and this is what you get.

I like how it turned out.  Simple but very cute.  I was thinking of adding some Christmas greenery but decided against it.  This way it can be used all Winter instead of just Christmas time.  I live in Western Pennsylvania so unfortunately the winters are long.

Hopefully I inspired you to take something old and remake it to something new and useful.

Come visit me at: http://betweennapsontheporch.blogspot.com/2011/10/door-knob-repair-made-hard-welcome-to.html#more

all crafts Homemade Projects ~ Add Yours {10/24}

Saturday, October 22, 2011

LUNCH TIME SCORE

I found these babies today at lunch time at the local thrift store.  I love, love, love old suitcases.  These are going to Sister #1 because she keeps nagging asking me to find her old suitcases.  Don't you just love them.


I also found some irish linen and a really cool plate. 

I did some quick shopping on my 30 minute lunch break.  Don't you agree?

Friday, October 21, 2011

Christmas project #1

My first Christmas project done.  I have been seeing these ornament wreaths all over blogland so I decided to try one myself.  I purchased the styrofoam wreath from the dollar store and covered it with silver tinsel, also from the dollar store.  Then I just glued the ornaments to the wreath.  I really did use alot of ornaments.  


This is going to the shop for resale.  

Please leave me a comment, I'm curious if you like it or not.

Thanks for stopping by.  Keep checking back, many many more Christmas projects coming soon.

Friday, October 14, 2011

Another Life Lesson Learned

Last night my Dear Mother was honored at a charity dinner in Station Square in Pittsburgh for her many many years of service.  That would be over 50 years of service donating to a cause near and dear to her heart the Chimbote Mission in Peru.  I can’t even fathom giving each and every year for over 50 years. 

To understand this a little better, my mother is not a rich woman.  Not in the sense of the word as money rich.  She will tell you that she is rich in love and kindness that she has experienced in her 90 years on this earth from her huge family. 

There were times when I was growing up that I remember my mother working two jobs.  My father was disabled back when I was 11 years old and I am the youngest of 6 children.  So for many many years she worked very hard to keep it all together yet she always donated to her charities.  Growing up I always remember a picture of at least one little girl taped to the refrigerator.  These were her adopted children she would tell us.  Each month she would send money to the organization to help, feed and cloth these kids. 

 When you are a child yourself you just don’t understand why she is doing this.  In my adult years I have a much better understanding as to why she gave each and every month.  She would say that God has blessed her with 6 healthy children and she wanted to give back.  What a wonderful example she has set for all her children, grandchildren and great grandchildren. 

How ironic that the day she was honored for her charity work was also the day of her 90th birthday.  As her 6 children and 2 of her oldest granddaughters and one Great granddaughter traveled with her to Pittsburgh, we got to sit back and enjoy with her her moment in the spot light. She was honored by Bishop, David Zubik of the Diocese of Pittsburgh.

Bella, Mom, Me, Lori, Carol, Leigh, Sona, Crissa, William & Denise
 
How fortunate I am to have such a wonderful giving mother.  Watching my Mother today I learned another lesson on life. 

You always have enough to give just a little to someone else.

Happy Birthday Mom,  I love you.


Wednesday, October 12, 2011

SECOND GO ROUND FOR THIS TABLE


This is the 2nd go round for this table.  I didn't take a picture of it when I purchased it at a yard sale this summer.  The table was just bare wood and the top had a split in it. 

I covered the top with scrapbook paper and painted a distressed the rest of the table.  It was like this for about 3 months and I was ready to redo it again when Hubby suggested that I add a ceramic tile to  the top  to cover the split in the wood.  

I did just that, I purchased a ceramic tile from Lowes for $5.24 and Hubby glued it to the top of the table and here is the finished product.


Much better.  This is a keeper!

I'm linking up to:

Tuesday, October 11, 2011

FALL CENTERPIECE

I learned how to make burlap rosettes this week and added them to this candle.

 I added some sugar cookie potpouri and fall leaves to this wicker chip & dip bowl and it is now a beautiful centerpiece for the Fall.

I just love how this burlap rosette turned out.  Thanks for stopping by, please leave me a comment so I know you were here.

Monday, October 10, 2011

another table ready to go.......................

Here is another table ready for the open house.

Can you see the beat up table that has the snowman propped up against it, I found it in a barn sale and saved it.  I cleaned it up and painted it red, antiqued it and distressed it. 

This is what it looks like now...........


I love how it turned out.  It was hard to let it go.

I'm linking up to:
Chic on a Shoestring Decorating